One of the great features of developing in SwiftUI is Xcode Previews which enable rapid UI iteration by rendering code changes in near real-time alongside the SwiftUI code. At DoorDash we make heavy use of Xcode Previews along with the SnapshotTesting library from Point-Free to ensure that screens look how we expect while developing them and ensure they don’t change in unexpected ways over time. SnapshotTesting can be used to capture a rendered image of a View and create an XCTest failure if the new image doesn’t match the reference image on disk. Xcode Previews in combination with SnapshotTesting can be used to provide quick iterations while still ensuring views continue to look the way they’re intended without fear of unexpected changes.
The challenge of using Xcode Previews and SnapshotTesting together is that it can result in a lot of boilerplate and code duplication between previews and tests. To solve this problem DoorDash engineering developed PreviewSnapshots, an open-source preview snapshot tool that can be used to easily share configurations between Xcode previews and snapshot tests. In this article, we will delve into this topic by first providing some background into how Xcode previews and SnapshotTesting work and then explaining how to use the new open-source tool with illustrative examples of how to remove code duplication by sharing view configurations between previews and snapshots.
How Xcode Previews work
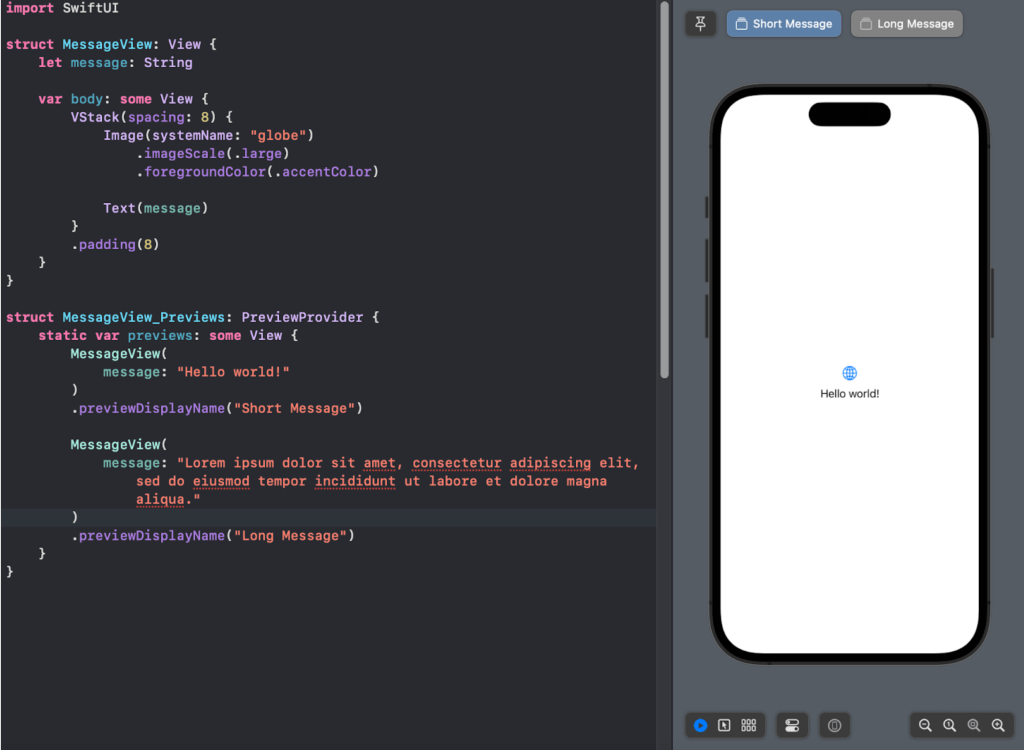
Xcode Previews allow developers to return one or more versions of a View from a PreviewProvider and Xcode will render a live version of the View alongside the implementation code.
As of Xcode 14 views with multiple previews are presented as selectable tabs along the top of the preview canvas as pictured in Figure 1.

How SnapshotTesting works
The SnapshotTesting library allows developers to write test assertions about the appearance of their views. By asserting that a view matches the reference images on disk, developers can be sure that views don’t change in unexpected ways over time.
The example code in Figure 2 will compare both the short and long versions of MessageView with the reference images stored to disk as testSnapshots.1 and testSnapshots.2 respectively. The snapshots were originally recorded by SnapshotTesting and automatically named after the test function along with the assertion’s position within the function.

The problem with using Xcode Previews and SnapshotTesting together
There’s a lot in common between the code used for Xcode Previews and for creating snapshot tests. This similarity can result in code duplication and extra effort for developers when trying to embrace both technologies. Ideally, developers could write code for previewing a view in a variety of configurations and then reuse that code for snapshot testing the view in those same configurations.
Introducing PreviewSnapshots
Solving this code duplication challenge is where PreviewSnapshots can help. PreviewSnapshots allow developers to create a single set of view states for Xcode Previews and create snapshot test cases for each of the states with a single test assertion. Below we will walk through how this works with a simple example.
Using PreviewSnapshots for a simple view
Let’s say we have a view that takes in a list of names and displays them in some interesting way.
Traditionally we’d want to create a preview for a few interesting states of the view. Perhaps empty, a single name, a short list of names, and a long list of names.
struct NameList_Previews: PreviewProvider {
  static var previews: some View {
    NameList(names: [])
      .previewDisplayName("Empty")
      .previewLayout(.sizeThatFits)

    NameList(names: [“Alice”])
      .previewDisplayName("Single Name")
      .previewLayout(.sizeThatFits)

    NameList(names: [“Alice”, “Bob”, “Charlie”])
      .previewDisplayName("Short List")
      .previewLayout(.sizeThatFits)

    NameList(names: [
      “Alice”,
      “Bob”,
      “Charlie”,
      “David”,
      “Erin”,
      //...
    ])
    .previewDisplayName("Long List")
    .previewLayout(.sizeThatFits)
  }
}
Then we’d write some very similar code for snapshot testing.
final class NameList_SnapshotTests: XCTestCase {
  func test_snapshotEmpty() {
    let view = NameList(names: [])
    assertSnapshot(matching: view, as: .image)
  }

  func test_snapshotSingleName() {
    let view = NameList(names: [“Alice”])
    assertSnapshot(matching: view, as: .image)
  }

  func test_snapshotShortList() {
    let view = NameList(names: [“Alice”, “Bob”, “Charlie”])
    assertSnapshot(matching: view, as: .image)
  }

  func test_snapshotLongList() {
    let view = NameList(names: [
      “Alice”,
      “Bob”,
      “Charlie”,
      “David”,
      “Erin”,
      //...
    ])
    assertSnapshot(matching: view, as: .image)
  }
}
The long list of names could potentially be shared between previews and snapshot testing using a static property, but there’s no avoiding manually writing an individual snapshot test for each state being previewed.
PreviewSnapshots allows developers to define a single collection of interesting configurations, and then trivially reuse them between previews and snapshot tests.
Here is what an Xcode preview looks like using PreviewSnapshots:
struct NameList_Previews: PreviewProvider {
  static var previews: some View {
    snapshots.previews.previewLayout(.sizeThatFits)
  }

  static var snapshots: PreviewSnapshots<[String]> {
    PreviewSnapshots(
      configurations: [
        .init(name: "Empty", state: []),
        .init(name: "Single Name", state: [“Alice”]),
        .init(name: "Short List", state: [“Alice”, “Bob”, “Charlie”]),
        .init(name: "Long List", state: [
          “Alice”,
          “Bob”,
          “Charlie”,
          “David”,
          “Erin”,
          //...
        ]),
      ],
      configure: { names in NameList(names: names) }
    )
  }
}
To create a collection of PreviewSnapshots we construct an instance of PreviewSnapshots with an array of configurations along with a configure function to set up the view for a given configuration. A configuration consists of a name, along with an instance of State that will be used to configure the view. In this case, the state type is [String] for the array of names.
To generate the previews we return snapshots.previews from the standard previews static property as illustrated in Figure 3. snapshots.previews will generate a properly named preview for every configuration of the PreviewSnapshots.

For a small view that’s easy to construct, PreviewSnapshots provides some additional structure but doesn’t do much to reduce the lines of code within previews. The major benefit for small views comes when it’s time to write snapshot tests for the view.
final class NameList_SnapshotTests: XCTestCase {
  func test_snapshot() {
    NameList_Previews.snapshots.assertSnapshots()
  }
}
That single assertion will snapshot test every configuration in the PreviewSnapshots. Figure 4 shows the example code alongside the reference images in Xcode. Additionally, if any new configurations are added in the previews they will automatically be snapshot tested with no change to the test code.

assertSnapshotsFor more complex views with lots of arguments, there’s even more benefit.
Using PreviewSnapshots for a more complex view
In our second example we take a look at a FormView which takes several Bindings , an optional error message, and an action closure as arguments to its initializer. This will demonstrate the increased benefits of PreviewSnapshots as the complexity of constructing the view increases.
struct FormView: View {
  init(
    firstName: Binding<String>,
    lastName: Binding<String>,
    email: Binding<String>,
    errorMessage: String?,
    submitTapped: @escaping () -> Void
  ) { ... }

  // ...
}
Since PreviewSnapshots is generic over the input state we can bundle up the various input parameters into a small helper structure to pass into the configure block and only have to do the work of constructing a FormView once. As an added convenience PreviewSnapshots provides a NamedPreviewState protocol to simplify constructing input configurations by grouping the preview name along with the preview state.
struct FormView_Previews: PreviewProvider {
  static var previews: some View {
    snapshots.previews
  }

  static var snapshots: PreviewSnapshots<PreviewState> {
    PreviewSnapshots(
      states: [
        .init(name: "Empty"),
        .init(
          name: "Filled",
          firstName: "John", lastName: "Doe", email: "john.doe@doordash.com"
        ),
        .init(
          name: "Error",
          firstName: "John", lastName: "Doe", errorMessage: "Email Address is required"
        ),
      ],
      configure: { state in
        NavigationView {
          FormView(
            firstName: .constant(state.firstName),
            lastName: .constant(state.lastName),
            email: .constant(state.email),
            errorMessage: state.errorMessage,
            submitTapped: {}
          )
        }
      }
    )
  }

  struct PreviewState: NamedPreviewState {
    let name: String
    var firstName: String = ""
    var lastName: String = ""
    var email: String = ""
    var errorMessage: String?
  }
}
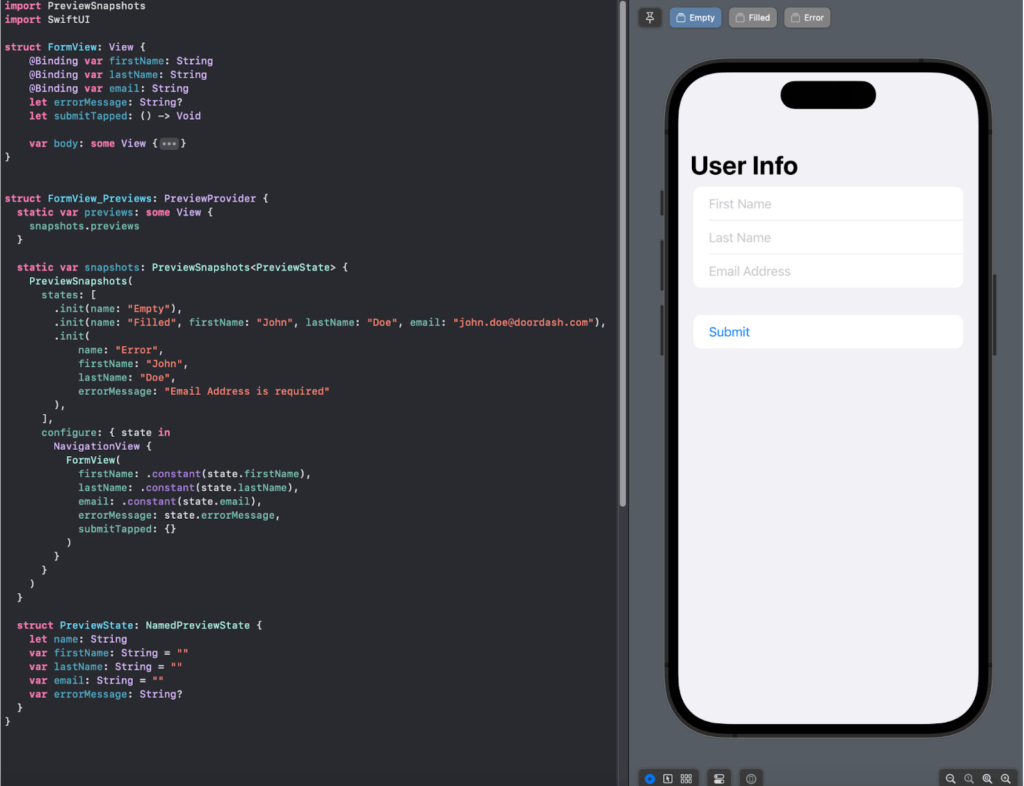
In the example code we created a PreviewState structure that conforms to NamedPreviewState to hold the name of the preview along with the first name, last name, email address, and optional error message to construct the view. Then in the configure block we create a single instance of FormView based on the configuration state passed in. By returning snapshots.preview from PreviewProvider.previews, PreviewSnapshots will loop over the input states and construct a properly named Xcode preview for each state as seen in Figure 5.

Once we’ve defined a set of PreviewSnapshots for previews we can again create a set of snapshot tests with a single unit test assertion.
final class FormView_SnapshotTests: XCTestCase {
  func test_snapshot() {
    FormView_Previews.snapshots.assertSnapshots()
  }
}
As with the simpler example above this test case will compare each of the preview states defined in FormView_Previews.snapshots against the reference image recorded to disk and generate a test failure if the images don’t match the expectation.
Conclusion
This article has discussed some of the benefits of using Xcode Previews and SnapshotTesting when developing with SwiftUI. It also demonstrated some of the pain points and code duplication that can result from using those two technologies together and how PreviewSnapshots allows developers to save time by reusing the effort they put into writing Xcode previews for snapshot testing.
Instructions for incorporating PreviewSnapshots into your project, as well as an example app making use of PreviewSnapshots, are available on GitHub.


